If you have recently noticed cracks in your wall plaster after construction, you are not alone. Plaster cracks are one of the most common issues seen in Indian homes, especially within the first few months after plastering or painting work is completed.
Sometimes these cracks are small hairline marks that only affect the paint finish. In other cases, the cracks may look wider, deeper, or continue growing over time, making homeowners worry about construction quality or structural safety.
The good news is that not all plaster cracks are dangerous.
Many cracks in wall plaster happen due to normal shrinkage, plaster curing problems, weather conditions, or poor site practices during construction. However, some plaster wall cracks may indicate moisture issues, settlement, or movement between RCC and brick masonry.
Understanding why plaster cracks happen can help you:
- Identify whether the crack is serious or cosmetic
- Prevent future wall plaster cracking
- Choose the right plaster crack repair method
- Improve construction quality during new home construction
In this guide, we explain the common causes of plaster cracks, different types of cracks in wall plaster, how to identify serious warning signs, and practical methods to prevent and repair plaster cracks in your home.
Common Types of Plaster Cracks
Not all plaster cracks look the same. The appearance, location, depth, and pattern of the crack often give important clues about the actual problem behind it.
For example, hairline cracks in plaster wall surfaces are usually caused by shrinkage during drying, while diagonal cracks near doors or windows may indicate movement or settlement.
Before repairing any crack, it is important to understand what type of plaster crack you are dealing with.
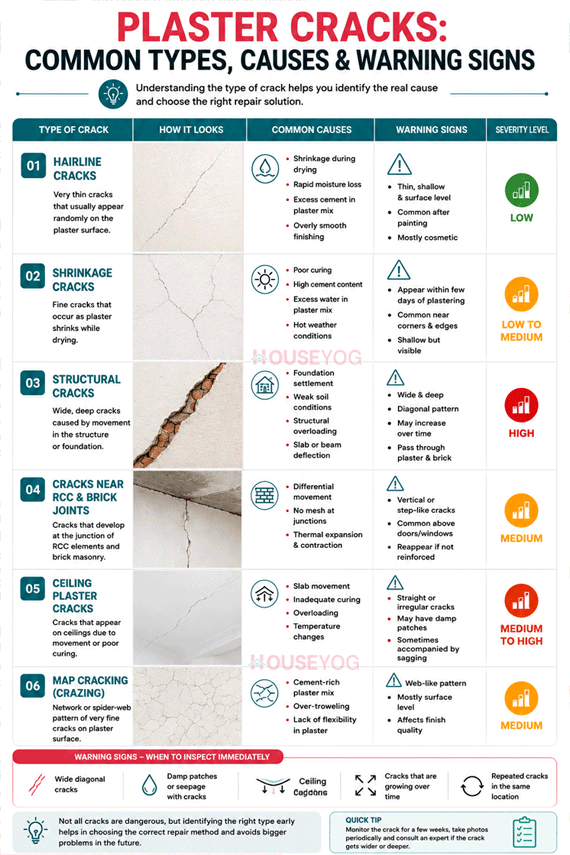
Here are the most common types of plaster cracks we see in Indian homes:
| Crack Type | Appearance | Main Cause | Severity |
| Hairline cracks | Thin random lines | Shrinkage during drying | Low |
| Shrinkage cracks | Fine surface cracks | Rapid moisture loss | Low to Medium |
| Structural cracks | Wide diagonal cracks | Settlement or structural movement | High |
| Joint cracks | Cracks near RCC-wall joints | Differential movement | Medium |
| Ceiling plaster cracks | Straight or irregular cracks in ceiling | Slab movement or curing issues | Medium to High |
| Map cracking | Network or spider-web pattern | Cement-rich plaster mix | Medium |
Some of these plaster wall cracks are purely cosmetic, while others may indicate deeper construction or structural issues. Let’s understand each type of crack in detail so you can identify whether the problem is minor, repairable, or something that needs professional inspection.
1. Hairline Cracks in Plaster
Hairline cracks in plaster are among the most common plaster cracks seen in homes. These cracks are very thin and usually appear randomly across the plaster surface.
In most cases, hairline cracks are cosmetic and do not affect structural safety. However, they often become more noticeable after putty and paint work is completed, especially under direct lighting or darker paint shades.
These cracks are commonly seen in newly constructed homes and are usually caused by plaster shrinkage during the drying process.
Common causes of hairline plaster cracks
Hairline cracks in plaster wall surfaces usually develop due to:
- Rapid drying of plaster
- Insufficient curing
- Excess cement in plaster mix
- Overly smooth finishing
- Plastering during hot weather conditions
In many Indian homes, these plaster cracks appear within the first few months after construction, especially during summer when walls dry very quickly.
2. Shrinkage Cracks in Plaster
Shrinkage cracks in plaster develop when the plaster loses moisture too quickly and contracts during the drying process. These are among the most common wall cracks after plastering, especially in newly constructed Indian homes.
Unlike structural cracks, shrinkage cracks are usually shallow and affect the plaster surface more than the wall itself. However, if left unattended, they can become more visible after putty and paint application.
You may commonly notice shrinkage cracks:
- Within a few days of plastering
- Near wall corners and edges
- Across larger wall surfaces
- In areas where curing was stopped too early
Common causes of shrinkage cracks in plaster
Shrinkage cracks in plaster are usually caused by:
- Poor plaster curing
- High cement content in mortar
- Excess water in plaster mix
- Plastering on dry brick walls
- Rapid drying due to heat or strong wind
In many local construction projects, plaster curing is stopped after just 2–3 days to save time or labour. This is one of the biggest reasons why plaster cracks after construction become visible within the first few months of occupancy.
3. Structural Cracks in Walls and Plaster
Structural cracks are more serious than normal plaster cracks because they are usually caused by movement in the building structure itself, not just the plaster surface.
Unlike hairline or shrinkage cracks, structural cracks tend to be wider, deeper, and more noticeable over time. In some cases, homeowners first notice them as small diagonal cracks near doors or windows, which gradually become larger over the months or years.
These cracks are commonly seen:
- Nar beam-column junctions
- Around doors and window corners
- Along staircases
- Across walls from corner to corner
One important warning sign is that the crack continues through both the plaster and the brickwork underneath. This usually indicates that the movement is happening within the wall or structural system itself.
Common causes of structural cracks
Structural cracks in walls and plaster may develop due to:
- Foundation settlement
- Weak or uneven soil conditions
- Slab or beam deflection
- Structural overloading
- Improper structural design
- Nearby excavation or vibration
In some Indian homes, structural cracks may also appear due to differential settlement, especially in buildings constructed on filled soil or low-compaction ground.
If you notice cracks becoming wider over time, or if doors and windows start jamming along with the cracks, it is best to get the area inspected by a structural engineer or experienced architect rather than simply covering the crack with putty or paint.
4. Cracks Near RCC and Brick Joints
Cracks near RCC beams, columns, and brick wall junctions are extremely common in residential buildings. These plaster wall cracks usually appear as straight vertical or diagonal lines where two different materials meet.
Homeowners often notice these cracks above doors and windows, along beam edges, beside RCC columns, and near electrical conduit chasing areas.
In many cases, these cracks become visible within the first year after construction, especially after the first summer or monsoon cycle.
The main reason behind these cracks is that RCC concrete and brick masonry behave differently over time. Even small movement, shrinkage, or temperature changes can create stress at the junction, which eventually becomes visible on the plaster surface.
Common causes of RCC-wall joint cracks
These cracks are commonly caused by:
- Differential movement between RCC and brick masonry
- Improper joint preparation before plastering
- Absence of chicken mesh reinforcement
- Shrinkage difference between materials
- Vibration or minor settlement
On many residential sites, plaster is directly applied over RCC-wall junctions without using mesh reinforcement. This often leads to visible cracks later, even when the structural work itself is completely safe.
Using chicken mesh or fiber mesh at RCC-wall junctions before plastering can significantly reduce the chances of such cracks appearing later.
While wall cracks are more common, ceiling plaster cracks can also appear in many homes, especially after repainting, seepage, or slab movement.
5. Ceiling Plaster Cracks
Ceiling plaster cracks are another common issue noticed by homeowners after construction, repainting, or renovation work. These cracks may appear as thin straight lines, random surface cracks, or wider cracks running across the ceiling.
In many cases, ceiling plaster cracks are superficial and limited to the plaster layer itself. However, certain cracks may also indicate slab movement, moisture seepage, or poor bonding between the plaster and concrete ceiling surface.
Homeowners commonly notice these cracks near ceiling corners, along beam lines, around electrical points, and below bathrooms or terraces.
Common causes of plaster cracks in ceiling
Ceiling plaster cracks are usually caused by:
- Inadequate plaster curing
- Excessive plaster thickness
- Poor surface preparation before plastering
- Vibration or minor slab movement
- Water seepage from upper floors or terraces
In some homes, ceiling plaster may also crack when smooth concrete surfaces are not properly roughened or treated before plaster application, resulting in weak bonding over time.
If ceiling plaster cracks are accompanied by damp patches, bubbling paint, hollow sound, or sagging plaster, the area should be inspected immediately. In such cases, simply repainting the ceiling may not solve the underlying problem.
6. Map Cracking or Crazing
Map cracking, also called crazing, appears as a network of very fine surface cracks that resemble a spider web or irregular map-like pattern on the wall.
Unlike structural cracks, these plaster cracks are usually shallow and mainly affect the appearance of the plaster or paint finish rather than the strength of the wall itself.
Homeowners often notice map cracking under direct lighting, after painting work, on smooth plaster surfaces and across larger wall areas.
Common causes of map cracking in plaster
Map cracking or crazing is commonly caused by:
- Overly rich cement plaster mix
- Over-trowelling during finishing
- Rapid surface drying
- Poor quality or very fine sand
- Insufficient curing
These cracks are more commonly seen on plaster surfaces that were finished too smoothly or dried too quickly during hot weather conditions.
Common Site Mistakes That Cause Plaster Cracks
Now that you understand the different types of plaster cracks, the next step is understanding why these cracks develop in the first place.
In many cases, plaster cracks after construction are not caused by a single major defect, but by small site mistakes during plastering, curing, or surface preparation. Even good quality cement and sand may still develop cracks if the plastering work is rushed or executed improperly.
This is especially common in residential construction projects where plaster work is completed quickly to move faster toward putty, paint, or handover stages.
Many plaster cracking issues can actually be traced back to broader construction quality and workmanship problems during home construction. You can also read our detailed guide on common house construction mistakes and how to avoid them: top house construction mistakes in India.
Here are some of the most common site practices that increase the chances of wall plaster cracking in Indian homes.
Curing Is Often Stopped Too Early
One of the biggest reasons for plaster cracks in Indian homes is incomplete curing after plastering work.
Fresh plaster needs continuous moisture for proper hydration and strength development. However, on many residential sites, curing is stopped after just 2–3 days to save labour, water, or time. As a result, the plaster dries too quickly and develops shrinkage cracks.
This problem becomes even more common during summer construction, when walls lose moisture rapidly due to heat and wind exposure.
Common curing mistakes:
- Curing for too few days
- Uneven water curing
- Delayed curing after plastering
- Plaster exposed to direct sunlight
For better crack resistance, plaster should ideally be cured for at least 7 days, and even longer during very hot weather.
Using a Cement-Rich Plaster Mix
Many people assume that adding extra cement makes plaster stronger and more durable. In reality, overly rich cement plaster mixes often increase shrinkage and make plaster more prone to cracking.
This is a common issue in small residential projects where mortar proportions are mixed manually without proper measurement.
Excess cement can make the plaster surface shrink more during drying, become brittle over time and develop fine surface cracks
At the same time, excess water in the plaster mix can weaken the plaster and increase drying shrinkage further.
Common plaster mix mistakes:
- Adding excess cement to mortar
- Inconsistent sand-cement proportion
- Using too much water
- Improper site mixing
In most cases, internal wall plaster uses ratios like 1:5 or 1:6, while external plaster may use 1:4 depending on project requirements and exposure conditions.
Applying Excessively Thick Plaster
Very thick plaster layers are more likely to develop cracks because they shrink more while drying.
This usually happens when uneven brickwork is corrected using thick plaster instead of properly aligning the masonry during wall construction.
In many homes, thick plaster patches are commonly found:
- Around electrical conduits
- Near plumbing chasing areas
- Beside beam edges
- On uneven brick wall surfaces
These thicker portions dry unevenly and become more vulnerable to shrinkage cracks and debonding.
Maintaining the correct plaster thickness is important to reduce cracking and improve long-term plaster durability. Here’s a detailed guide on recommended plaster thickness for internal and external walls.
Poor Surface Preparation Before Plastering
Even high-quality plaster can fail if the surface underneath is not prepared properly.
Before plastering begins, the wall surface should be clean, properly wetted, and capable of bonding well with the plaster layer. If this preparation is skipped, the plaster may eventually crack, loosen, or sound hollow.
Common preparation mistakes:
- Plastering on dry brick walls
- Dusty or loose wall surfaces
- Smooth RCC surfaces without hacking
- Untreated joints and gaps
This issue is particularly common in fast-paced construction projects where plastering starts before the masonry surface is properly prepared.
Plaster Drying Too Quickly in Summer
Rapid drying is another major reason for wall cracks after plastering, especially during hot and windy weather conditions.
When plaster loses moisture too quickly, it starts shrinking before gaining enough strength. This creates internal stress within the plaster layer and eventually leads to cracking.
High-risk situations include:
- Plastering during peak afternoon heat
- Strong wind exposure
- Delayed curing
- No pre-wetting of walls before plastering
In many Indian cities, plaster cracking becomes more noticeable during summer months because walls dry much faster than intended.
Ignoring RCC and Brick Junction Treatment
RCC concrete and brick masonry behave differently over time. If the junction between these materials is not treated properly before plastering, cracks often appear later along the joint line.
This is one of the most common reasons for straight-line plaster cracks near beams, columns, and door openings.
Common site mistakes:
- No chicken mesh at RCC-wall junctions
- Poor joint treatment
- Plaster applied directly over mixed materials
- Insufficient overlap at junction areas
Using chicken mesh or fiber mesh reinforcement at these junctions can significantly reduce the chances of future cracking.
Water Seepage Is Ignored Until Cracks Appear
Moisture is another major reason for plaster damage in homes.
In many cases, small seepage problems remain unnoticed until the plaster starts cracking, bubbling, or peeling. By the time paint damage becomes visible, moisture may have already weakened the plaster underneath.
Common moisture sources:
- Bathroom leakage
- Terrace seepage
- Plumbing line leakage
- External wall dampness
If water seepage is not fixed properly, plaster crack repair alone may only provide a temporary solution.
If moisture seepage is causing plaster damage, fixing the crack alone may not solve the problem permanently. Here’s a detailed guide on waterproofing methods, common leakage areas, waterproofing costs, and popular waterproofing brands used in Indian homes: ultimate guide to waterproofing in India.
Are Plaster Cracks Dangerous or Normal?
One of the biggest concerns you may have after noticing wall cracks is whether the crack is simply cosmetic or a sign of a deeper structural problem.
The good news is that many plaster cracks are normal, especially in newly constructed homes. Small hairline cracks in plaster wall surfaces often happen due to plaster shrinkage, drying, temperature changes, or minor movement in building materials. These cracks usually affect the surface finish more than the actual strength of the wall.
You may especially notice these plaster wall cracks:
- After putty and paint work
- During summer months
- Near corners and ceiling edges
- Under direct lighting or darker paint shades
In many cases, these cracks remain stable for years and can be repaired easily during repainting or maintenance work.
However, some cracks should not be ignored.
If you notice cracks that are wide, diagonal, getting longer over time, or passing through both the plaster and brickwork underneath, it could indicate movement in the wall or structure rather than simple surface shrinkage.
Similarly, ceiling plaster cracks accompanied by damp patches, bubbling paint, or sagging plaster may point toward seepage or bonding problems that need immediate attention.
You should also pay closer attention if:
- The same crack keeps reappearing after repair
- Doors or windows become difficult to close
- The wall sounds hollow while tapping
- Cracks become wider during monsoon or summer
These signs may indicate deeper issues beyond normal plaster shrinkage.
If you are unsure whether a crack is serious, one simple approach is to monitor it for a few weeks or months. Taking photos periodically can help you check whether the crack is stable or gradually increasing in width.
As a general rule, most small plaster cracks are cosmetic and repairable. But if the cracks are deep, expanding, moisture-related, or affecting ceilings and structural junctions, it is always better to get the area inspected by an experienced architect or structural engineer before simply covering the crack with putty or paint.
How to Prevent Plaster Cracks
Preventing plaster cracks is usually much easier and cheaper than repairing them later. In most cases, wall plaster cracking can be reduced significantly through proper workmanship, correct plaster mix, and good curing practices during construction.
Many plaster cracks seen in homes are not caused by poor materials alone, but by small site mistakes during plastering and finishing work. Paying attention to these details during construction can improve both the durability and appearance of your walls over time.
Here are some practical ways to help prevent plaster cracks in homes.
Ensure Proper Curing After Plastering
One of the best ways to reduce shrinkage cracks in plaster is proper curing.
Fresh plaster needs adequate moisture for gradual strength development. If the plaster dries too quickly, surface shrinkage stresses develop and eventually lead to cracking.
To reduce plaster cracking:
- Start curing after the initial setting period
- Continue curing for at least 7 days
- Cure more frequently during summer months
- Avoid uneven or incomplete curing
In many homes, plaster curing is stopped too early, especially on upper floors or exterior walls exposed to direct sunlight.
Use the Correct Plaster Mix Ratio
Using too much cement in plaster mortar may seem stronger initially, but it often increases shrinkage and cracking risk later.
A balanced plaster mix with proper cement-sand proportion and controlled water content helps improve workability and reduces internal stress during drying.
To improve plaster performance:
- Avoid overly rich cement mixes
- Maintain consistent site mixing
- Use clean, properly graded sand
- Avoid excess water in mortar
Improper mortar proportion is one of the most common reasons for shrinkage cracks in plaster surfaces.
Avoid Excessively Thick Plaster
Very thick plaster layers tend to shrink more while drying and are more likely to develop cracks or debonding issues later.
This problem is common where uneven brickwork is corrected using thick plaster instead of proper masonry alignment.
To reduce cracking risk:
- Avoid thick plaster in a single coat
- Use dubbing coat where required
- Apply plaster in stages if needed
- Maintain proper wall alignment before plastering
Maintaining the correct plaster thickness also improves bonding and long-term durability. Here’s a detailed guide on recommended plaster thickness for internal and external walls.
Use Mesh at RCC and Brick Wall Junctions
Cracks near RCC beams and brick wall junctions are extremely common in homes due to differential movement between materials.
Using chicken mesh or fiberglass mesh at these junctions helps distribute stress and reduce visible plaster cracks later.
This is especially useful above doors and windows, near beam-column junctions, around electrical chasing areas and where RCC and masonry surfaces meet.
Proper junction treatment can significantly reduce straight-line cracks after construction.
Avoid Plastering During Extreme Heat
Plastering during very hot or windy weather can cause rapid moisture loss and increase the chances of shrinkage cracks.
If possible, plastering work should be planned during cooler parts of the day, especially during peak summer months.
Some good site practices include:
- Pre-wetting masonry before plastering
- Protecting fresh plaster from direct sunlight
- Starting curing early
- Avoiding plastering during afternoon heat
These small precautions can make a big difference in reducing plaster cracks after construction.
How to Repair Plaster Cracks
The right plaster crack repair method depends on the type, depth, and cause of the crack. Some plaster cracks are purely cosmetic and can be repaired easily during repainting, while others may require deeper repair work or professional inspection.
Before repairing any crack, it is important to understand why the crack appeared in the first place. Otherwise, the crack may return again after a few months, even after putty and paint work.
Repairing Hairline Cracks in Plaster
Small hairline cracks in plaster are usually surface-level cracks and are fairly easy to repair.
In most homes, these cracks become more noticeable after painting, especially under direct lighting or darker paint shades. Since these cracks are generally cosmetic, the repair process is usually simple and inexpensive.
A typical hairline plaster crack repair includes:
- Slightly opening the crack surface
- Removing loose particles and dust
- Applying crack filler or polymer putty
- Sanding the surface smoothly
- Repainting after proper drying
If the underlying plaster is stable, these repairs usually work well for minor surface cracks.
Repairing Shrinkage or Moderate Plaster Cracks
Larger shrinkage cracks or local debonding cracks may require more than just putty filling.
If the plaster sounds hollow, feels weak, or has already started separating from the wall surface, the damaged portion should be repaired properly rather than simply painted over.
Depending on the condition of the wall, repair work may include:
- Removing loose or weak plaster portions
- Cleaning the affected surface
- Applying bonding agent if required
- Replastering the damaged area
- Curing properly after repair
In movement-prone areas, flexible crack fillers may help reduce the chances of cracks reappearing later.
If large portions of plaster need to be repaired or redone, understanding current plastering rates can also help you estimate repair costs more accurately. Check our detailed guide on plastering cost per sq ft in India.
Repairing Cracks Near RCC and Wall Junctions
If cracks repeatedly appear near RCC beams, columns, or door corners, simple putty repair may not last long.
In such cases, the affected plaster area may need to be reopened and reinforced using chicken mesh or fiberglass mesh before replastering.
This helps distribute movement stress more evenly and reduces visible cracking along the junction line.
Repairing Structural Cracks
Structural cracks should never be repaired cosmetically without identifying the actual cause first.
If the crack is caused by settlement, slab movement, or structural stress, simply covering the crack with putty or cement mortar will usually not solve the problem permanently.
You should consider professional inspection if you notice:
- Wide diagonal wall cracks
- Recurring cracks in the same location
- Deep cracks passing through brickwork
- Ceiling cracks with sagging
- Cracks increasing over time
In such situations, the underlying structural issue should be addressed first before starting plaster repair or repainting work.
FAQ about Plaster Cracks
Most plaster cracks after construction happen due to shrinkage, poor curing, rapid drying, incorrect plaster mix ratio, or movement between RCC and brick masonry.
Yes, small hairline cracks in plaster are common and are usually cosmetic in nature.
Yes. Poor plaster curing is one of the most common causes of shrinkage cracks in plaster.
These areas experience stress concentration and differential movement, making them more prone to plaster wall cracks.
Proper curing, correct plaster thickness, good surface preparation, proper mix ratio, and mesh reinforcement at RCC joints can help prevent plaster cracks.
Conclusion
Plaster cracks are common in both new and old homes, but understanding why plaster cracks happen can help you identify whether the issue is cosmetic or more serious.
Many cracks in wall plaster are caused by shrinkage, poor curing, rapid drying, excessive plaster thickness, or differential movement between RCC and masonry. In other cases, moisture problems or structural settlement may be responsible.
The good news is that most plaster cracking problems can be reduced significantly through proper construction practices, correct curing methods, and better workmanship during plastering.
If you notice unusual plaster wall cracks, especially wide or growing cracks, it is always better to investigate the cause early before the problem becomes more expensive to repair later.
Popular on Houseyog Right Now!:


")
")
